Microsoft Outlook 2010 and 2013 Step-by-step Instructions
This page contains step-by-step instructions for Sensical.net customers on how to setup email accounts in Microsoft Outlook 2010 and 2013. You should read the general email instructions from the Sensical.net Support FAQ first.
Contents
| 1. | Create a new IMAP account |
|---|---|
| 2. | Optimise your IMAP settings |
| 3. | Create a new POP account |
| 4. | Review (changing and/or removing) existing accounts |
1. Create a new IMAP account in Microsoft Outlook 2010 and 2013to top
-
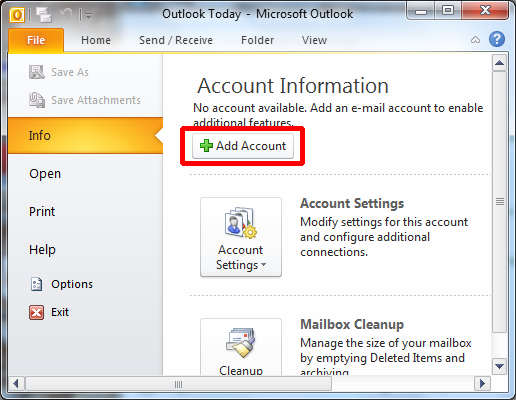
From Microsoft Outlook 2010 or 2013, click on the File menu and select the Add Account button as per the picture below.
-
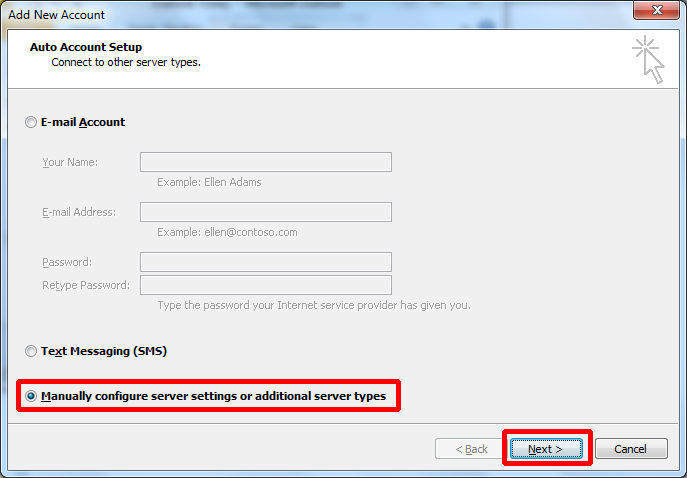
The following window will now be displayed. Select Mannually configure server settings or additional server types and then click the Next > button as per the picture below.
-
The following window will now be displayed. The Internet E-mail option will be selected, so just click the click the Next > button as per the picture below.

-
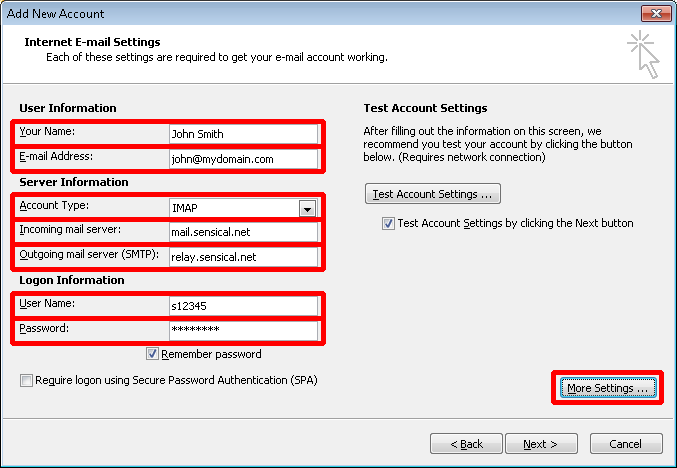
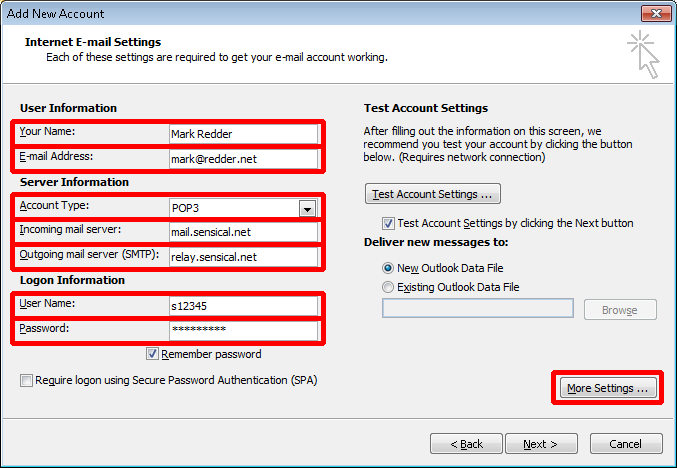
The following window will now be diplayed. Complete the following information as per the picture below:
- Your name: Email sent using this email account will appear to be from this name. For example, enter a personal name such as John Smith or the name of a business department such as My Company Accounts Department.
- E-mail Address: Your email address. This must be a valid email address as configured by Sensical.net. Emails will be sent from this addres and any replies will come to this address.
- Account Type: Must be set to IMAP
- Incoming mail server: Must be set to mail.sensical.net
- Outgoing mail server (SMTP): Must be set to relay.sensical.net
- User Name: Your Sensical.net username, for example s12345
- Password: Your Sensical.net password; as assigned to the above Sensical.net username.
Then click the More Settings... button.
-
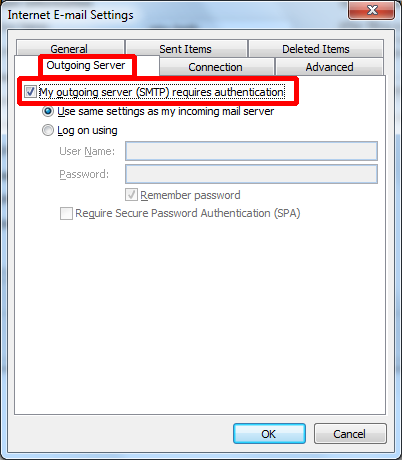
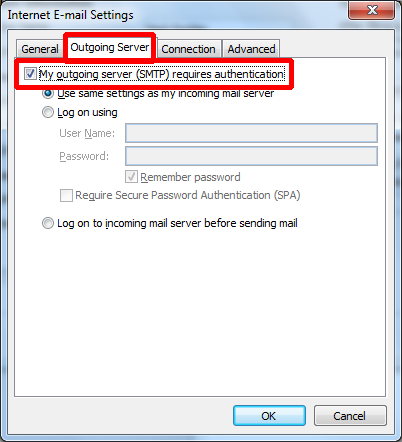
Then click the Outgoing Server tab and check the My outgoing server (SMTP) requires authentication box as per the picture below. Then click the Advanced tab.
-
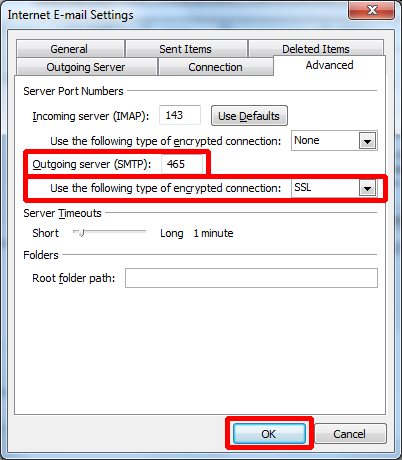
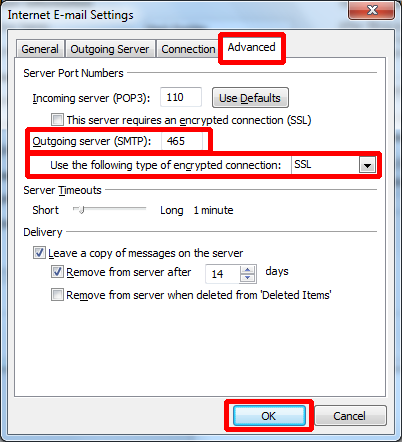
Then ensure that the following settings are set correctly as per the picture below:
- The second drop-down next to Use the following type of encrypted connection is set to SSL
- Outgoing server (SMTP): is set to 465
Then click the OK button.
-
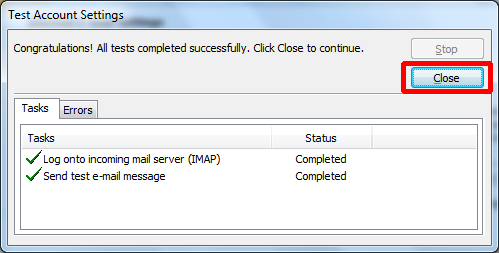
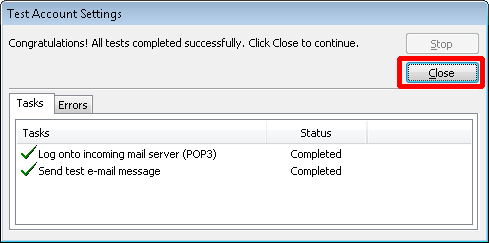
You will be returned to the Add New Account window. Click the Next > button and the email account will be tested. You should see the following window indicating that the test was successful. If the test was not successful, go back and double-check the previous steps.
Click the Close button.
-
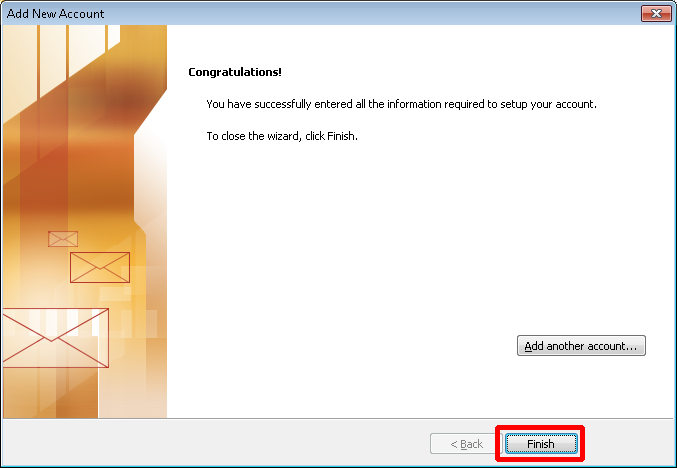
The Congratulations window will be diplayed. Click the Finish button.
-
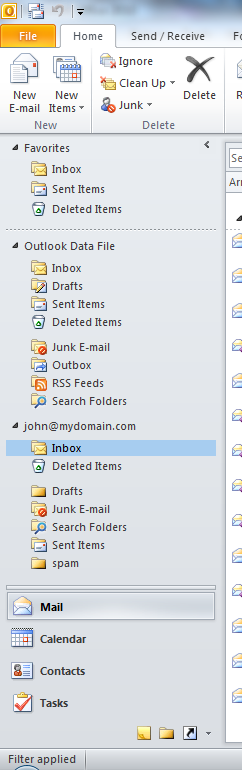
Your new IMAP email account is now setup. Your incoming email will be delivered to the Inbox underneath your new account, as shown underneat the john@mydomain.com folder in the example picture below.
2. Optimise your IMAP settings in Microsoft Outlook 2010 and 2013to top
-
Speed up receiving email by optimising your Send/Receive Groups
You can reduce the information that is downloaded every time you Send & Receive, so that only your Inbox is automatically downloaded. All your other folders will only be downloaded when you specifically click on them.
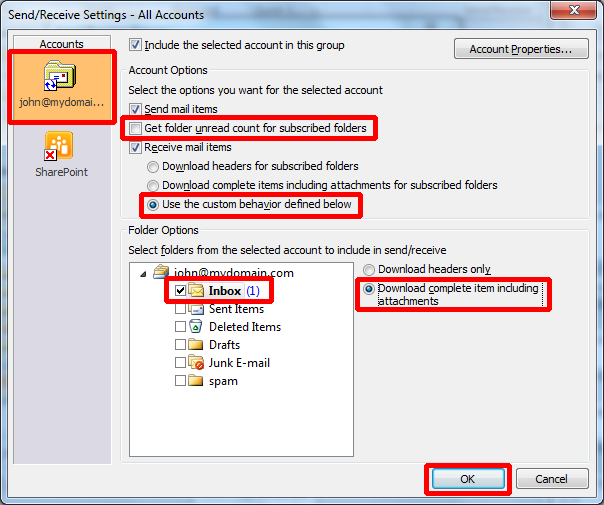
Press Ctrl+Alt+S to bring up the Send/Receive Groups window as per the picture below. Select All Accounts and click the Edit... button.

The following window will appear. First select your Sensical.net IMAP account on the left. Then change the settings as per the picture below. The optimial settings are:
- Get folder unread count for subscribed folders should not be ticked.
- Receive mail items shold be ticked with the sub-option set to Use the custom behavior defined below. Then in the Folder Options section at the bottom, the only folder to be ticked should be Inbox. And with Inbox selected the option on the right should be Download complete item including attachments.
Click OK then Close when you are done.
-
Store your Sent Items in the cloud
Sometimes your sent email is stored only on your local PC, and not in the cloud. This means sent email cannot be accessed from other email clients or via WebMail.
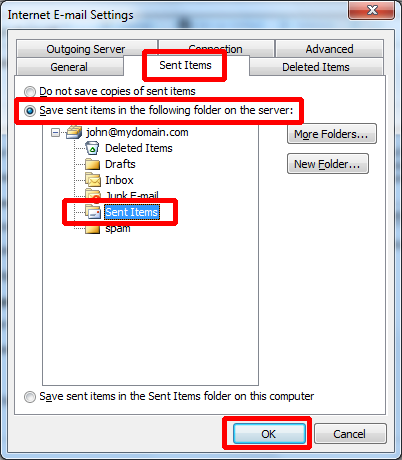
To store your sent email in the cloud, click the File menu and then click the Account Settings... button. Then select your Sensical.net IMAP account from the list and click the Change... button. Click the Sent Items tab and ensure the configuration is as per the picture below. Click OK and Close when you are done.
-
Turn off Auto-Archive
With IMAP, all your email is stored in the cloud and your local computer only stores a copy. Therefore you don't really need your local computer to archive your email.
From the File menu select Options. Then select the Advanced tab on the left and click the AutoArchive Settings... button on the right. Ensure that the check-box next to Run AutoArchive every XX days is not ticked. Click OK then OK again.
3. Create a new POP account in Microsoft Outlook 2010 and 2013to top
-
From Microsoft Outlook 2010 or 2013, click on the File menu and select the Add Account button as per the picture below.
-
The following window will now be displayed. Select Mannually configure server settings or additional server types and then click the Next > button as per the picture below.
-
The following window will now be displayed. The Internet E-mail option will be selected, so just click the click the Next > button as per the picture below.
-
The following window will now be diplayed. Complete the following information as per the picture below:
- Your name: Email sent using this email account will appear to be from this name. For example, enter a personal name such as John Smith or the name of a business department such as My Company Accounts Department.
- E-mail Address: Your email address. This must be a valid email address as configured by Sensical.net. Emails will be sent from this addres and any replies will come to this address.
- Account Type: Must be set to POP3
- Incoming mail server: Must be set to mail.sensical.net
- Outgoing mail server (SMTP): Must be set to relay.sensical.net
- User Name: Your Sensical.net username, for example s12345
- Password: Your Sensical.net password; as assigned to the above Sensical.net username.
Then click the More Settings... button.
-
Then click the Outgoing Server tab and check the My outgoing server (SMTP) requires authentication box as per the picture below. Then click the Advanced tab.
-
Then ensure that the following settings are set correctly as per the picture below:
- The second drop-down next to Use the following type of encrypted connection is set to SSL
- Outgoing server (SMTP): is set to 465
Then click the OK button.
-
You will be returned to the Add New Account window. Click the Next > button and the email account will be tested. You should see the following window indicating that the test was successful. If the test was not successful, go back and double-check the previous steps.
Click the Close button.
-
The Congratulations window will be diplayed. Click the Finish button.
-
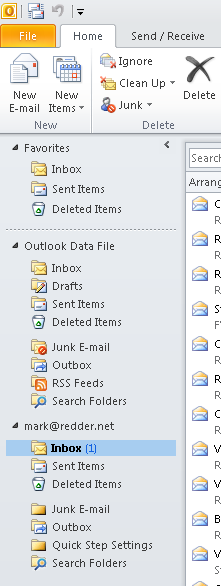
Your new POP email account is now setup. Your incoming email will be delivered to the Inbox underneath your new account, as shown underneat the mark@redder.net folder in the example picture below.
4. Review existing accounts in Microsoft Outlook 2010 and 2013to top
-
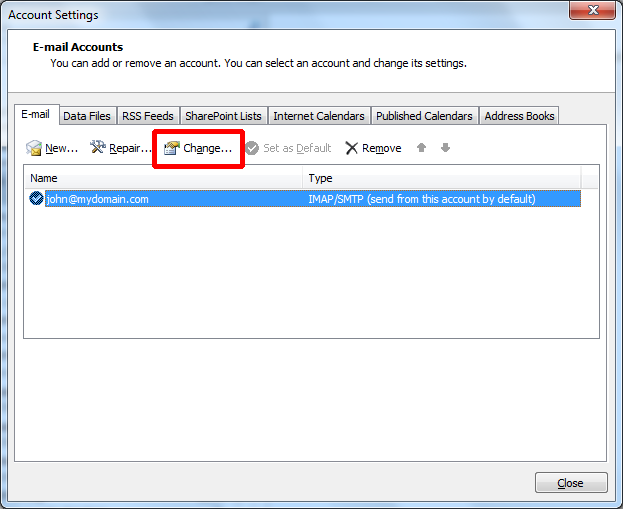
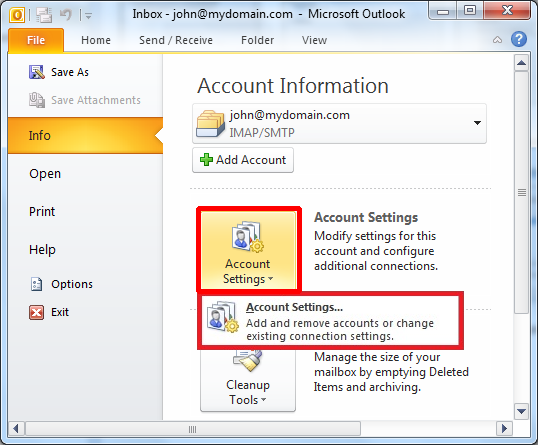
You can review your email accounts in Microsoft Outlook 2010 and 2013 at any time by clicking on the File menu and select the Account Settings... button as per the the following picture.
-
You will then be presented with a list of your email accounts as per the picture below. You can edit existing accounts by selecting the account name in the list then clicking the Change... button. Then follow the instructions from step 4 for creating a new IMAP email account or a new POP email account.
You can also remove unwanted accounts by selecting the account name in the list then clicking the Remove button and then clicking the Yes to confirm.
When you have finished reviewing your email accounts click the Close button.