Microsoft® Windows® Mail 6 Step-by-step Instructions
This page contains step-by-step instructions for Sensical.net customers on how to setup email accounts in Microsoft® Windows® Mail version 6 in Microsoft® Windows VistaTM. These instructions also apply to Microsoft® Outlook® Express version 6 in Microsoft® Windows® XP although the pictures will have different designs. You should read the general email instructions from the Sensical.net FAQ first.
Contents
| 1. | Create New POP Account |
|---|---|
| 2. | Verify Existing POP Account |
| 3. | Create New IMAP Account |
| 4. | Verify Existing IMAP Account |
| 5. | Add Additional Identity |
Create New POP Account in Microsoft® Windows® Mail version 6to top
-
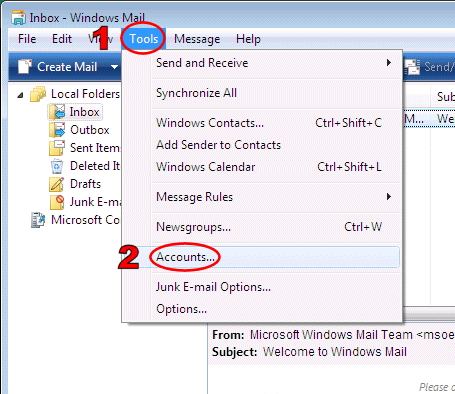
When you load Microsoft® Windows® Mail for the first time the first 3 steps are skipped and you should jump straight to step 4. Otherwise, click on the Tools menu and select the Accounts... option as per the picture below.
-
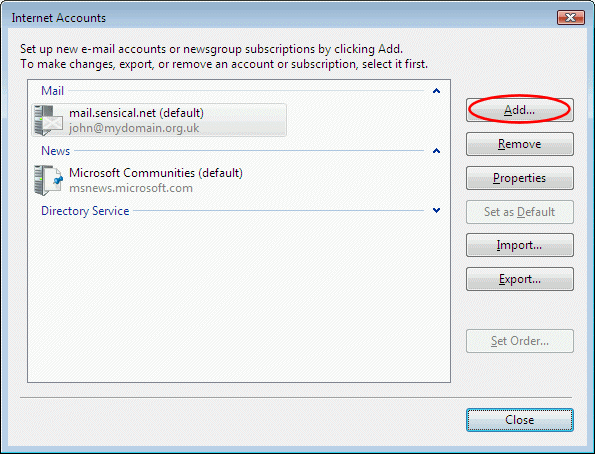
Click the Add... button as per the picture below.

-
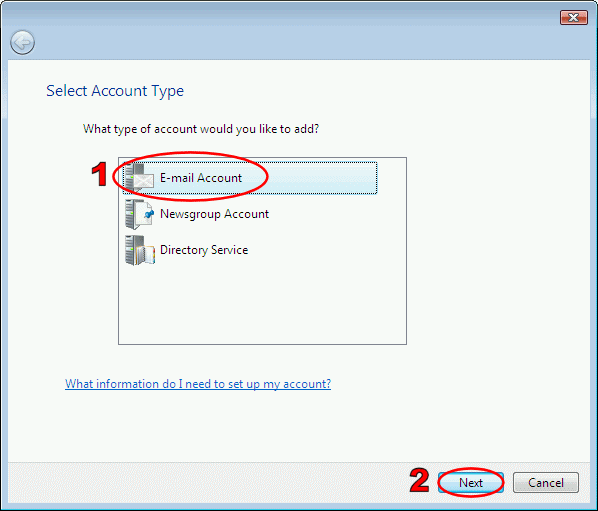
Select the E-mail Account option and then click the Next button as per the picture below.
-
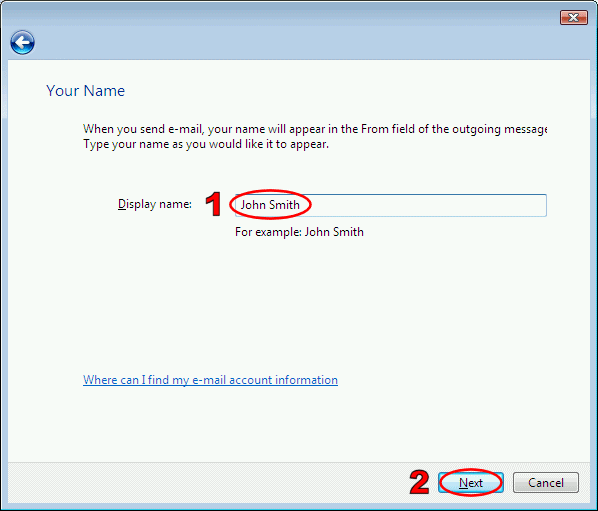
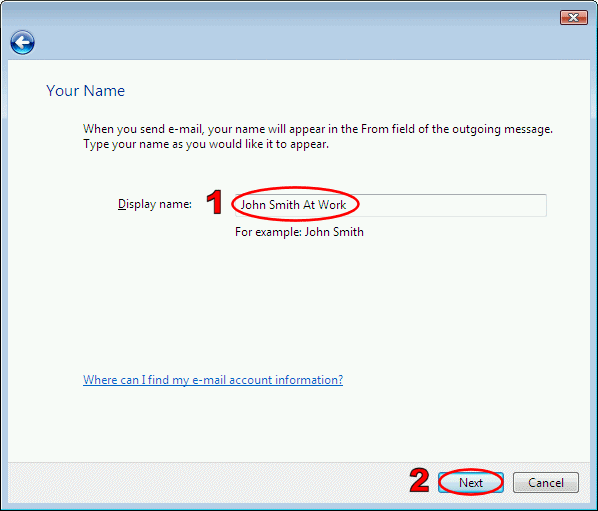
Enter your name in the Display name box and click the Next button as per the picture below. The emails you send will appear to be from the name that you enter here.
-
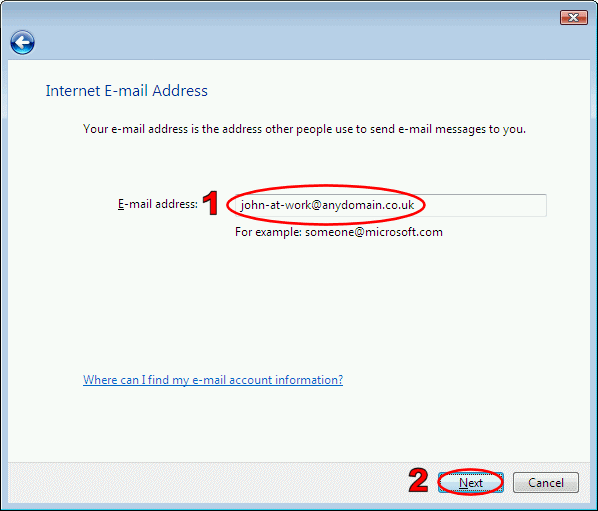
Enter your email address in the E-mail address box and click the Next button as per the picture below.

-
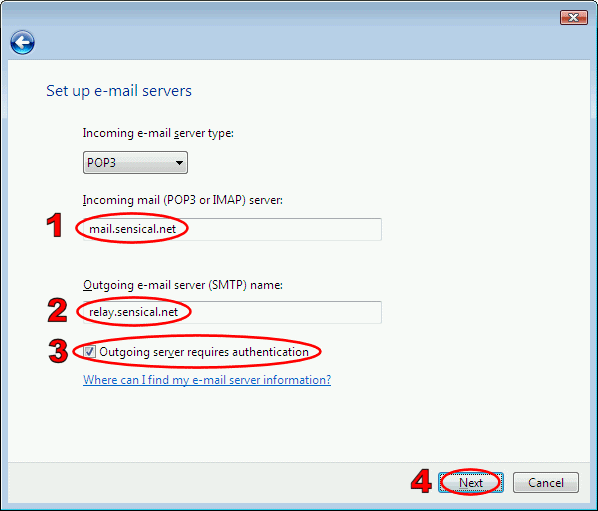
Follow these steps as per the picture below.
- Enter mail.sensical.net in the Incoming mail (POP or IMAP) server box.
- Enter relay.sensical.net in the Outgoing e-mail server (SMTP) name box.
- Ensure Outgoing server requires authentication is ticked.
- Click the Next button.
-
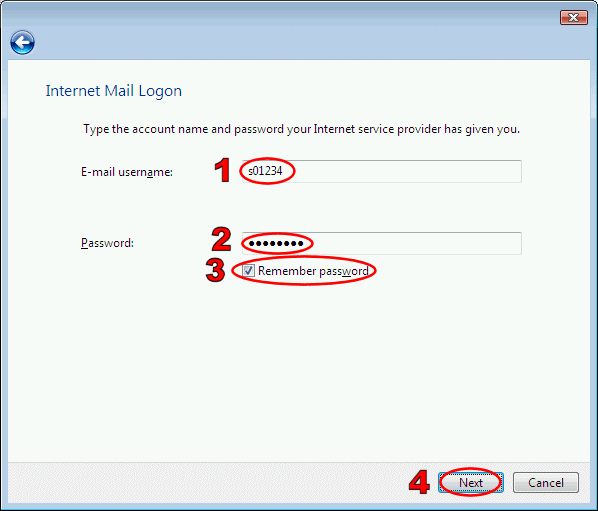
Follow these steps as per the picture below.
- Enter your Sensical.net username in the E-mail username box.
- Enter your Sensical.net password in the Password box.
- Ensure Remember password is ticked.
- Click the Next button.
-
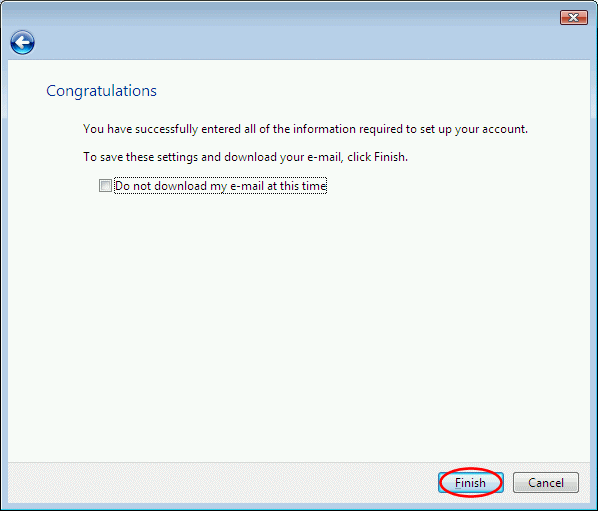
Click the Finish button as per the picture below.
-
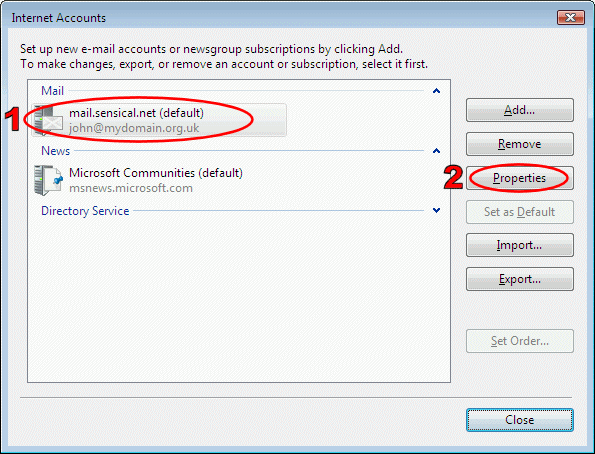
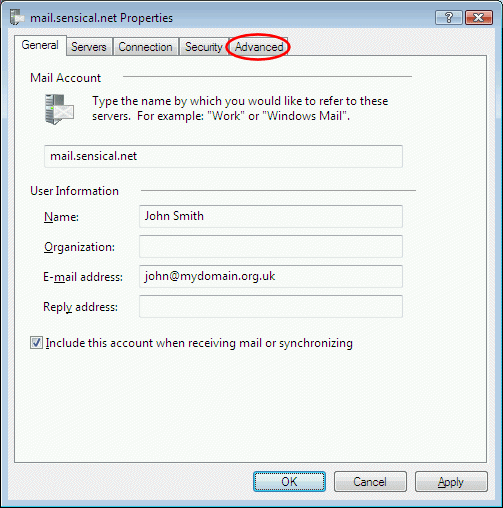
Click the newly-created email account and then click the Properties button as per the picture below.
-
Click the Advanced tab as per the picture below.
-
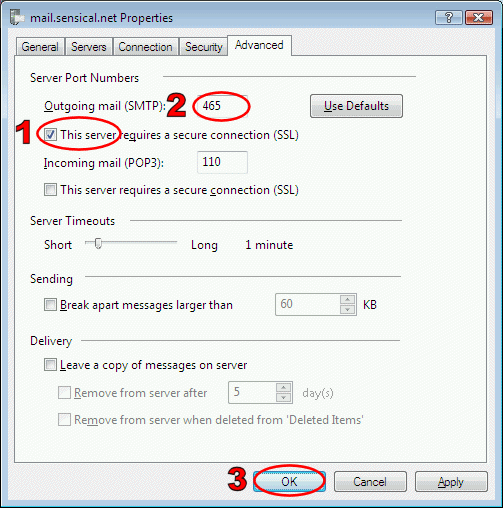
Follow these steps as per the picture below.
- Ensure the first This server requires a secure connection (SSL) box is ticked.
- Ensure the Outgoing mail (SMTP) box contains 465.
- Click the OK button.
-
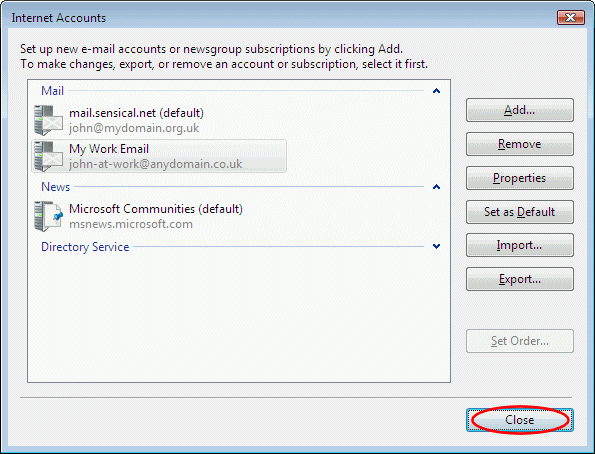
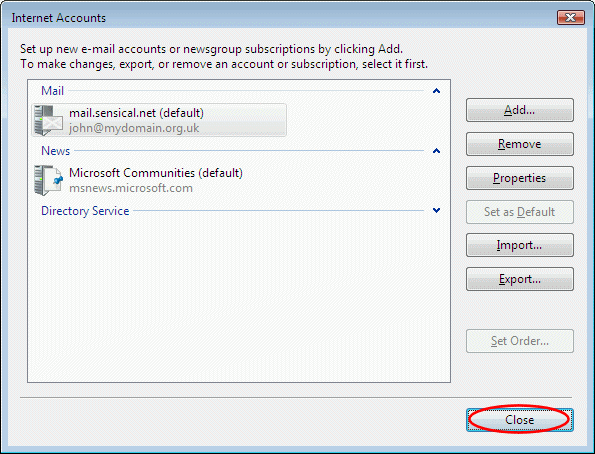
Click the Close button as per the picture below.
Verify Existing POP Account in Microsoft® Windows® Mail version 6to top
-
In Microsoft® Windows® Mail click on the Tools menu and select the Accounts... option as per the picture below.
-
Click to select the existing mail account you would like to verify then click the Properties button as per the picture below.
-
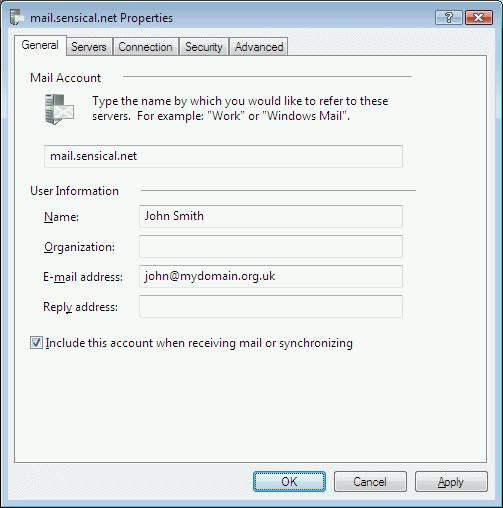
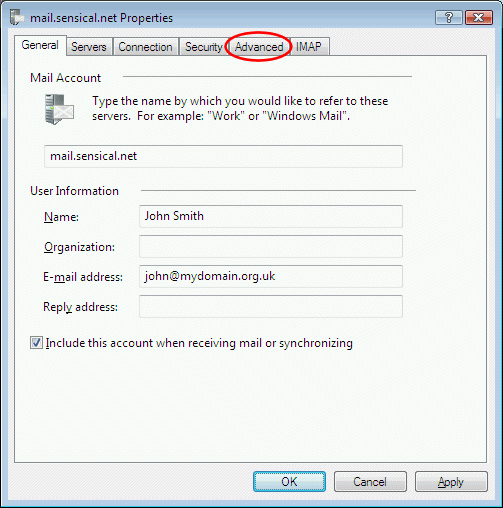
Ensure the settings are as per the picture below then click the Servers tab.
The Mail Account, Name, Organization, E-mail address and Reply address boxes should be set as per your personal preferences.
The Include this account when receiving mail or synchronizing should be ticked unless this mail account is a secondary identity - see below for how to create additional identities.
-
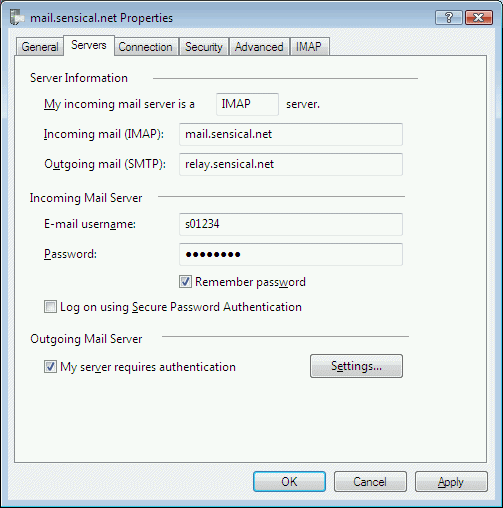
Ensure the settings are as per the picture below then click the Settings... button.
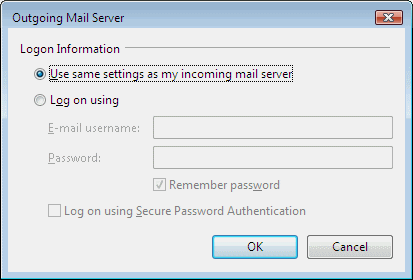
The E-mail username and Password boxes should contain your Sensical.net username and password respectively.

-
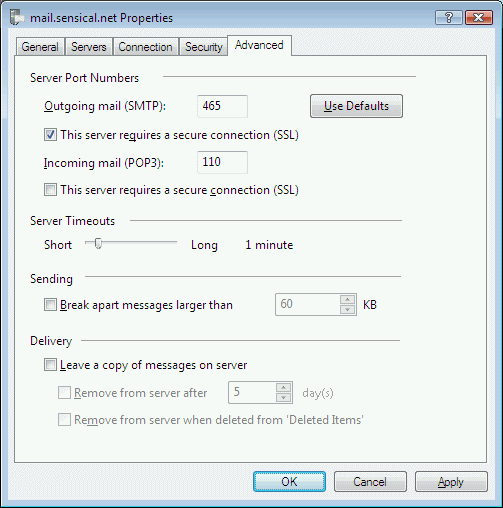
Ensure the settings are as per the picture below then click the OK button then click the Advanced tab.
-
Ensure the settings are as per the picture below then click the OK button.
-
Click the Close button as per the picture below.
Create New IMAP Account in Microsoft® Windows® Mail version 6to top
-
When you load Microsoft® Windows® Mail for the first time the first 3 steps are skipped and you should jump straight to step 4. Otherwise, click on the Tools menu and select the Accounts... option as per the picture below.
-
Click the Add... button as per the picture below.
-
Select the E-mail Account option and then click the Next button as per the picture below.
-
Enter your name in the Display name box and click the Next button as per the picture below. The emails you send will appear to be from the name that you enter here.
-
Enter your email address in the E-mail address box and click the Next button as per the picture below.
-
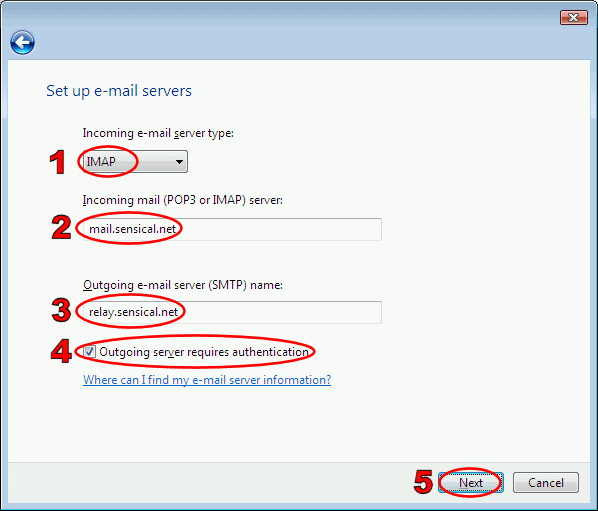
Follow these steps as per the picture below.
- Select IMAP as the Incoming e-mail server type.
- Enter mail.sensical.net in the Incoming mail (POP or IMAP) server box.
- Enter relay.sensical.net in the Outgoing e-mail server (SMTP) name box.
- Ensure Outgoing server requires authentication is ticked.
- Click the Next button.
-
Follow these steps as per the picture below.
- Enter your Sensical.net username in the E-mail username box.
- Enter your Sensical.net password in the Password box.
- Ensure Remember password is ticked.
- Click the Next button.
-
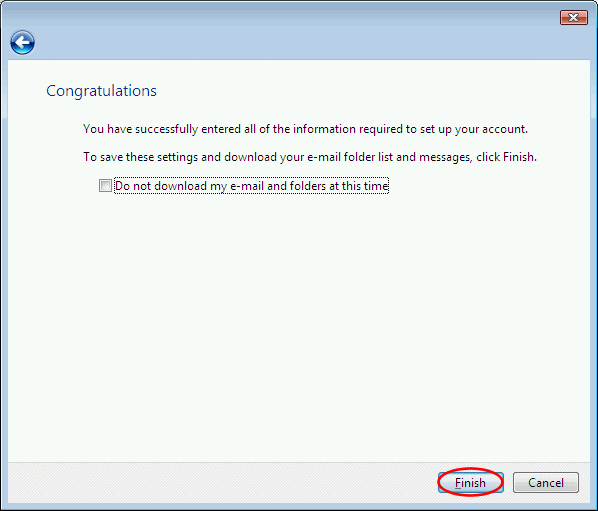
Click the Finish button as per the picture below. Your computer will then connect to the Internet to download your mail folders.
-
Click the newly-created email account and then click the Properties button as per the picture below.
-
Click the Advanced tab as per the picture below.
-
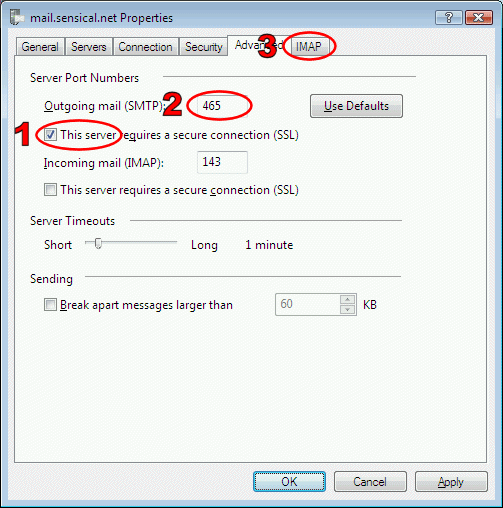
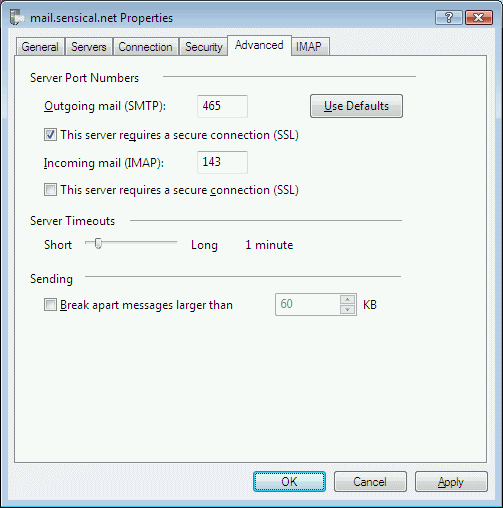
Follow these steps as per the picture below.
- Ensure the first This server requires a secure connection (SSL) box is ticked.
- Ensure the Outgoing mail (SMTP) box contains 465.
- Click the IMAP tab.
-
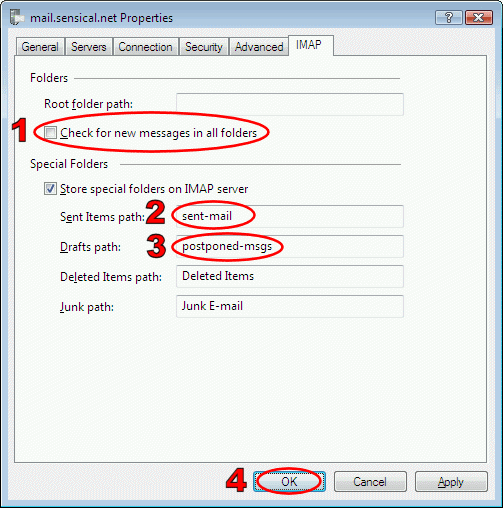
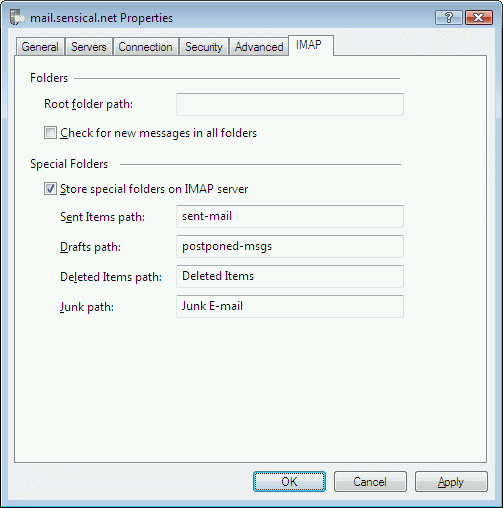
Follow these steps as per the picture below.
- Ensure Check for new messages in all folders is NOT ticked.
- Ensure the Sent Items path box contains sent-mail.
- Ensure the Drafts path box contains postponed-msgs.
- Click the OK button.
-
Click the Close button as per the picture below.
Verify Existing IMAP Account in Microsoft® Windows® Mail version 6to top
-
In Microsoft® Windows® Mail click on the Tools menu and select the Accounts... option as per the picture below.
-
Click to select the existing mail account you would like to verify then click the Properties button as per the picture below.
-
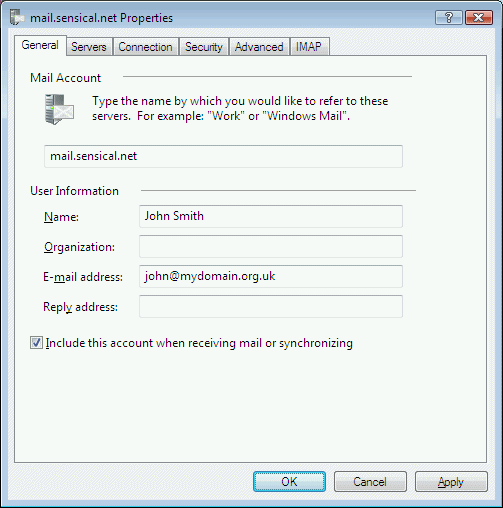
Ensure the settings are as per the picture below then click the Servers tab.
The Mail Account, Name, Organization, E-mail address and Reply address boxes should be set as per your personal preferences.
The Include this account when receiving mail or synchronizing should be ticked unless this mail account is a secondary identity - see below for how to create additional identities.
-
Ensure the settings are as per the picture below then click the Settings... button.
The E-mail username and Password boxes should contain your Sensical.net username and password respectively.
-
Ensure the settings are as per the picture below then click the OK button then click the Advanced tab.
-
Ensure the settings are as per the picture below then click the IMAP tab.
-
Ensure the settings are as per the picture below then click the OK button.
-
Click the Close button as per the picture below.
Add Additional Identity in Microsoft® Windows® Mail version 6to top
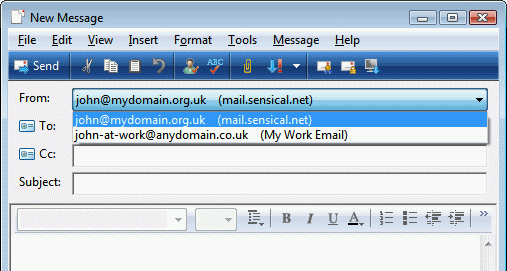
You can configure your email client to send and receive email for multiple identities (i.e. different names and/or email addresses). When sending email with multiple identities you will be able to choose which identity to use as per the picture below.
First you should create a POP or IMAP account for your primary identity using the instructions above. Then you can follow these instructions below to add an account for each additional identity. Please note, that each identity is attached to a single Sensical.net email account; if you have multiple Sensical.net email accounts then you should not use these instructions below; instead you should just add multiple POP and/or IMAP accounts for each Sensical.net email account using the instructions above.
-
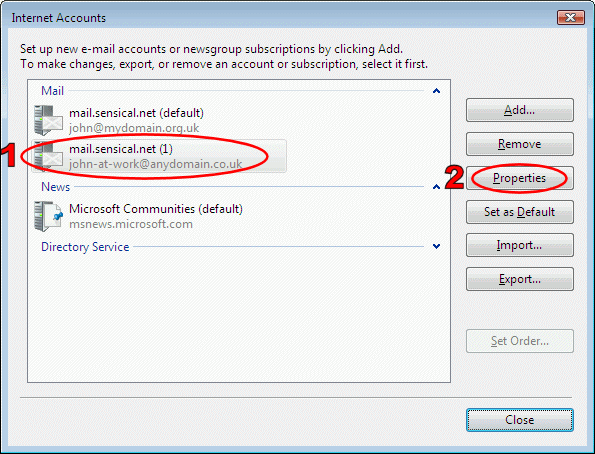
In Microsoft® Windows® Mail click on the Tools menu and select the Accounts... option as per the picture below.
-
Click the Add... button as per the picture below.
-
Select the E-mail Account option and then click the Next button as per the picture below.
-
Enter the name of the identity in the Display name box and click the Next button as per the picture below. The emails you send from this identity will appear to be from the name that you enter here.
-
Enter the email address of the identity in the E-mail address box and click the Next button as per the picture below.
-
Follow these steps as per the picture below.
- Enter mail.sensical.net in the Incoming mail (POP or IMAP) server box.
- Enter relay.sensical.net in the Outgoing e-mail server (SMTP) name box.
- Ensure Outgoing server requires authentication is ticked.
- Click the Next button.
-
Follow these steps as per the picture below.
- Enter your Sensical.net username in the E-mail username box. This username should be the same as the email account you created for your primary identity.
- Enter your Sensical.net password in the Password box. This password should be the same as the email account you created for your primary identity.
- Ensure Remember password is ticked.
- Click the Next button.
-
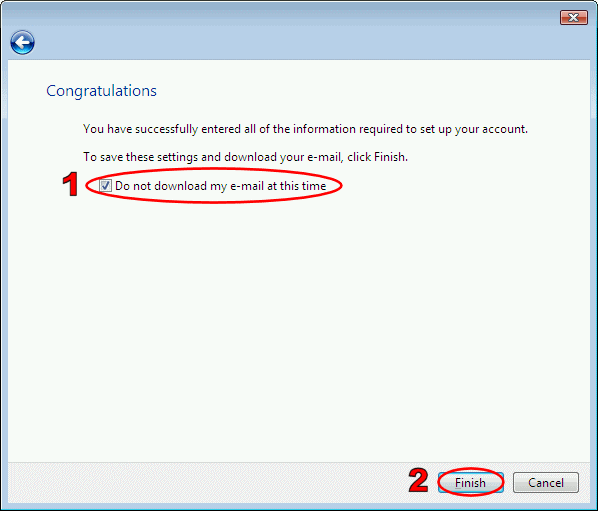
Ensure the Do not download my e-mail at this time box is ticked then click the Finish button as per the picture below.
-
Click the newly-created email account and then click the Properties button as per the picture below.
-
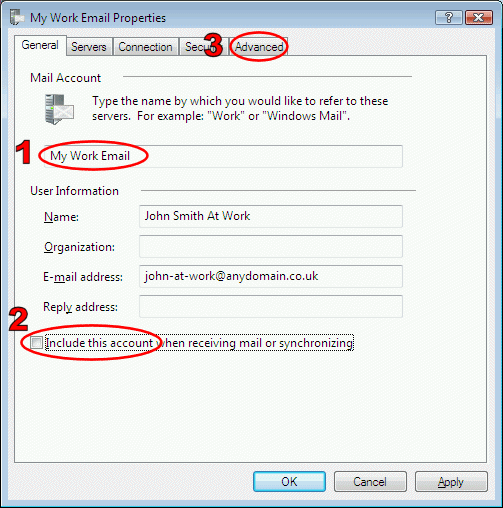
Follow these steps as per the picture below.
- Alter the Mail Account box so it contains a helpful description to remind you which email identity this is.
- Ensure the Include this account when receiving mail or synchronizing is NOT ticked.
- Click the Advanced tab.
-
Follow these steps as per the picture below.
- Ensure the first This server requires a secure connection (SSL) box is ticked.
- Ensure the Outgoing mail (SMTP) box contains 465.
- Click the OK button.
-
Click the Close button as per the picture below.